Testing
Each PXS is factory-tested before shipping. However, you should perform the
following tests before starting your development with the LayGO
Toolkit (if you are a developer) or before using your application program
(if you are an end user).
- Internal Loopback Test will verify that the PXS
and the LayGO software are functional and correctly installed and
configured.
- External Loopback Test will verify the
physical interfaces and the cabling. Use this test for the standard PXSe (which
has only one synchronous line)
- Back-to-Back Test will verify the
physical interfaces and the cabling. Use this test for the PXS or the 2-line
PXSe
The LayGO PXS Toolkit setup program installed the necessary test files and
programs in your Start menu.
Before running any of the tests, make sure you have installed and
configured the PXS and have entered the correct IP address in the LayGO
system stack configuration. If you changed the default (192.168.250.250), use
wxedcfg
to modify the stackpxs.cfg configuration file.
Internal Loopback Test
Simply click Start → Programs → LayGO PXS Toolkit → WinTdrv - Loop.
(For a detailed explanation of the WinTdrv
program, see Testing with tdrv
in the LayGO Installation Guide.)
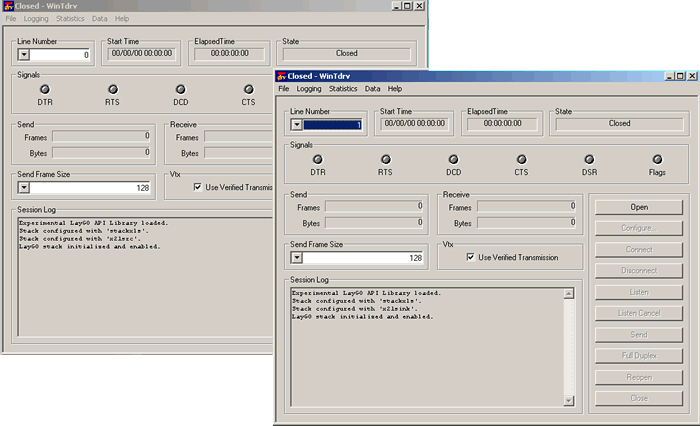
You will see the following window:
WinTdrv
Opening Screen
The top left dialog shows that the program will use line 0, which corresponds to
synchronous port 0 on the PXS (later you will use the drop down list to change
it to line 1, corresponding to the synchronous port 1 on the PXS).
Now, do the following:
- Click on the Open button to execute a
lgo_Open() call to line 0. The State
display on the upper right corner should change to
Open and the
Open button will become grayed out. The Session
Log will show Line 0 open - CID = 0.
- Click on the Connect button to execute a
lgo_Connect() call on line 0. The line is
configured to internal loopback, so the transmitter is connected to the
receiver. The connect call will be successful, the State display on the upper
right corner should change to
Data Transfer state - XON and the
Connect button will become grayed out. The
Session Log will show Event received: Connected. The
Flags signal light will turn green indicating that
the receiver sees flags (x7E) on the line. The program will read any data
received and will log any event.
- Click on the Send button, to execute a
lgo_Write call on line 0. As the line is
configured to internal loopback, the same data will be read. In the Session
Log you will see:
> 0128 [0x0000]: Good
F0 07 41 42 43 44 45 46 47 48 49 4A 4B 4C 4D 4E # ..ABCDEFGHIJKLMN
(If you press the Send button repeatedly, a frame
will be transmitted with every click.)
- Press the Full Duplex button. This will send
data continuously through the transmitter, until the same button is clicked
again.
- Click Disconnect and then
Close.
- You should repeat the same procedure using line 1.
If you have any trouble during this procedure, check the
Troubleshooting section.
External Loopback Test
This test verifies that the PXS line drivers and receivers are correct, as well
as the interface cable.
Connect the synchronous interface cable to the PXS. Connect the appropriate
loopback plug to the connector. (The LayGO Hardware Guide has detailed diagrams
of loopback plugs.)
Now click Start → Programs → LayGO PXS Toolkit → WinTdrv - Source
Repeat the same procedure indicated above, for
Internal Loopback. The test is
similar but now data is going out through the cable and back from the loopback
plug to the PXS. If this test works correctly, the cable and the line drivers
and receivers are OK.
Back-to-Back Test
This test should be run only if the internal loopback test ran successfully. It
can only be run on a PXS with 2 lines.
Setup
Connect the PXS's 2 synchronous ports in a back-to-back fashion: Use a DB-26 to
DB-25 straight cable (P/N CBL-PXS-26/25-1) connected to each port and an
RS-422/EIA-530 null modem cable. (See the Null Modem Cables section of the
LayGO Hardware Guide.)
Alternatively, you may interconnect the 2 ports using a "crossover cable" (P/N
CBL-PXS-XOVER).
Test
Now, you will use two instances of WinTdrv
program. One will drive port 0 (which will be configured as clock source) and
the other port 1 (which will be configured as clock sink).
Start the first instance by clicking Start → Programs → LayGO PXS Toolkit → WinTdrv - Source.
Start the second instance with Start → Programs → LayGO PXS Toolkit → WinTdrv - Sink.
In the last wintdrv, change the line in the upper
left corner drop down list to 1.
Two instances of WinTdrv
Now do the following:
If you have problems performing this procedure, the Troubleshooting section may
help.

