wxdlmmonitor
wxdlmmonitor is a very basic LayGO DLM
program, primarily useful for capturing data traffic to disk for later analysis.
 Sample wxdlmmonitor Decode Window
Syntax
wxdlmmonitor
Optional command line parameters are:
    [-l <line number to monitor>]
    [-p <password to register monitor session with server>]
    [-s <host name or IP address of DLM server>]
The defaults for the optional command line parameters are as follows:
    name or ip address of server = localhost
    line number                  = 0
    password                     = <none>
Menu Options
- File
-
-
- New Capture File...
- Displays a "New Capture File" dialog box, to create and open a new
capture file where monitoring events will be written. Monitoring events
will be received when the Start button is clicked.
- Open Capture File...
- Displays an "Open Capture File" dialog box to display the contents of a captured file in the Event Log pane.
- Close Capture File...
- Closes the currently open capture file. The capture file is automatically closed
when the Stop button is clicked.
- Convert Capture File...
- Converts a previously captured file to a format compatible with Ethereal.
- Logging
-
Has only one option, to clear the Event Log pane
- Options
-
Has only one option, to configure the Session. When chosen the following dialog is shown:
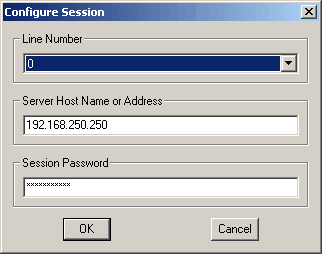 wxdlmmonitor Configure Session Dialog
These parameters correspond to the -l, -p and -s options on the command line.
- Help
- Brief help and about dialogs.
Using wxdlmmonitor to Capture Data
The most common use of wxdlmmonitor is to capture data to a file
so it can be later analyzed, typically to discover or reverse-engineer an
unknown protocol.
Use the following steps to capture a session:
- Set up the hardware, most likely using the PXS as a hardware tap.
- Make sure a regular session is going on between the DTE and the DCE.
- Start wxdlmmonitor with the appropriate
parameters (for host, line and password).
- Execute File → New Capture File and name the file to be crated.
- Click the Start button to start the data capture (the lower left LED becomes green).
- Click the Stop button when you want the data captured stopped. The capture
file is automatically closed.