The PXS is shipped with a default static IP address of 192.168.250.250
with a subnet mask of 255.255.0.0. If this address is part of your local
subnet, you can use telnet to configure the IP address.
The PXS's default IP address is part of your local subnet if your subnet is configured
to use either:
192.168.0.0/16 (subnet mask 255.255.0.0) or192.168.250.0/24 (subnet mask 255.255.255.0)If the PXS's default IP address is part of your local subnet and the address is not already in use by another device, you can simply attach the PXS to the subnet and continue to Setting up the Telnet Connection.
If, as is often the case, your local subnet is configured to use 192.168.xxx.0/24
(subnet mask 255.255.255.0) (where
xxx is something other than 250), the PXS's default IP address is
not in your local subnet, but you can create a route to the PXS using
the route command.
Note: For this method to work, the machine on which telnet is
to be run and the PXS to be configured must be attached to the same Ethernet LAN
(the PXS must be reachable from the PC without going through an IP router).
This is most easily achieved by attaching both the PXS and the PC to the same Ethernet
switch or hub.
In Windows, the route command is:
route add 192.168.250.0 mask 255.255.255.0 <IP address of PC>
This route will be lost on the next reboot. To make the route permanent, add
-p after route.
In Linux, assuming the Ethernet interface is eth0, the route command is:
route add -net 192.168.250.0 netmask 255.255.255.0 dev eth0
To make the route permanent, add the following line to /etc/sysconfig/static-routes:
eth0 net 192.168.250.0 netmask 255.255.255.0
Another option is to connect both the PXS and the PC to an isolated Ethernet switch or hub or to directly to each other with an Ethernet cable. (A normal straight-through cable will work for this purpose. A cross-over cable is not required since the PXS has an auto-MDX Ethernet port.)

To use this option, on the PC manually assign an IP
address of 192.168.250.251 with a subnet mask of 255.255.0.0
and a default gateway (which won't be used) of 192.168.250.1.
Once the PXS and the PC are on the same subnet, the RedBoot prompt can be accessed
via TCP/IP using any telnet client, such as
HyperTerminal.
To setup a telnet connection, start HyperTerminal and
enter a connection name (e.g. PXS Telnet) in the Connection Description dialog:

Click the button. In the Connect To dialog,
select Connect using TCP/IP (Winsock) and enter the
IP address of the PXS in the Host address field:

Click the button. HyperTerminal immediately connects to the PXS and you should see the password prompt:

Before entering the password, select File → Properties from the menu and click the Settings tab of the Connection Properties dialog:

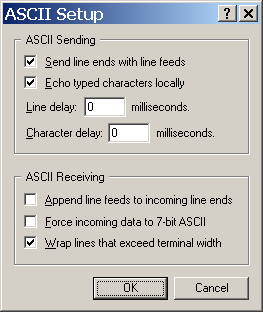
Press the button and select Send line ends with line feeds and Echo characters locally in the ASCII Setup dialog:

Close the 2 open dialogs to return to the main HyperTerminal screen.
If a password has been configured, enter it. Otherwise, just press <Enter>.
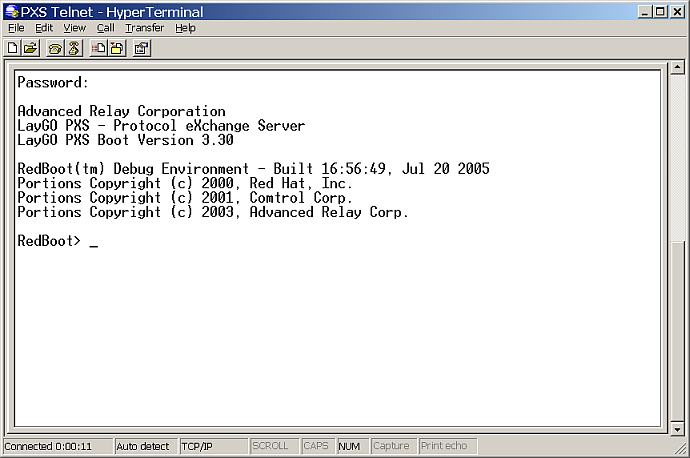
You should get banner and the RedBoot propmt:
